meta data for this page
Registering a database
Registering a database after creating it is necessary for IBExpert to recognize the presence of the database. When registering the database, is possible to specify some options, settings, and defaults.
To register a database, you can either go to Database in the navigation bar and click on Register Database or use the keycode combination of (Shift + Alt + R).
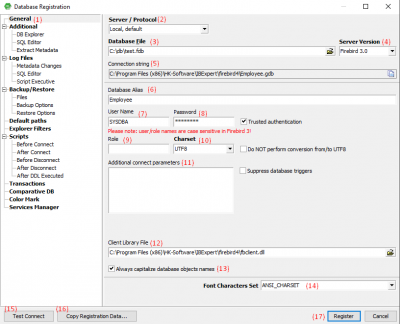
(1) inside the General tab, you can specify general properties and defaults for the database to be registered.
(2) The Server/Protocol must be specified on how you plan to store the database. The database can be either Local (localhost) or a Remote server. You can see the difference between Local or Remote servers in the Registering a database example guide. By specifying Localhost and Remote, a protocol can be specified and used even when working locally. To change the Server name and Port, you can check this click on here
(3) Database File: By clicking on the small folder icon on the right of this field, you can easily double-click on the database file, and the path will automatically be entered.
- Example path for Firebase: C:\Program Files (x86)\HK-Software\IBExpert\firebird4\Employee.fdb
- Example path for Interbase: C:Programs\Interbase\examples\EMPLOYEE.GDB
The database name, along with the drive and path, must always be specified if no database alias has been assigned. Please be aware that Firebird/InterBase® does not support databases on mapped drive letters, so the database file for a Windows server must be on a physical drive on the server.
(4) The Server Versions is a drop-down list of options for various versions of Firebird and InterBase. You must choose the correct version you are using.
(5) The connection string displays the (1) Server/Protocol and the (4) Database File together as a path. You can click on the icon at the right of the field to copy the path.
(6) Inside the Database Alias, you can give the database a name that specifies its intended use and you should make sure that the name is rather logical. The actual database name, server path, and drive information are hidden behind this simple alias name; improving security as users would only need to be informed of the alias name, and not the real location of the database. An example of a Database Alias can be an Employee.
(7) The User Name of the database should be the database owner or SYSDBA.
(8) Password: If you create a username under the name of SYSDBA, you must not use the password (masterkey), so you can have some security for your database. You can read more about the database username and password when Createing a Simple Database in IBExpert
(9) Role: The Role can be left empty but you can read more about it here
(10) The default Charset can be changed and specified as needed. As this character set is applicable throughout the entirety of the database unless overridden by the domain or field definition, the character set used when creating databases is intended to be used for foreign languages. You can read more about Character sets here
(11) The Additional Connect Parameters is an input field for additional specifications. System objects, such as system tables and system-generated domains and triggers, are an example of what you could enter in this field. These inputs can automatically be loaded into the Database Explorer when opening the Database Alias.
(12) Inside the Client Library File, you must Locate the fbclient.dll file inside your Firebird 3/4 file. To find the fbclient.dll file, first open File Explorer, open your Local Disk (C:), go to Program Files(x86), go to HK_Software, click on IBExpert, go to either Firebird 3 or Firebird 4 folders (choose the version of Firebird you are currently running), and then click on the fbclient.dll file. Next, Copy the file path, enter it inside the Client Library File, and enter the copied path.
- The fbclient.dll path for Firbird should look something like this: “C:\Program Files (x86)\HK-Software\IBExpert\firebird4\fbclient.dll”
(13) Always Capitalize Database Object Names: This is important because entries in SQL Dialect 3 can be written in either upper- or lowercase (conforming to the SQL 92 standard). However, InterBase® will accept these words when they are written in lowercase case, but not when they are written in uppercase case. Therefore, it is advised that this be turned on all the time.
(14) The Font Character Set is used only by the IBExpert interface display. It depends on the language used by Windows. The ANSI CHARSET should be specified if an ANSI-compatible language is being used.
(15) Test Connect: When you click on the button, a Comdiag dialog appears asking you to enter the Login, Password, and Role details for the database to be able to test it. If the login is correct, then a message pops up saying that either everything is working fine or an error message is displayed.
(16) Copy Registration Data: The current database can be built using the alias data from other registered databases that are already in existence. Simply select the registered database that will be used as the alias by clicking on the button.
(17) Click on the Register button to finally register the database.
