IBExpert screen
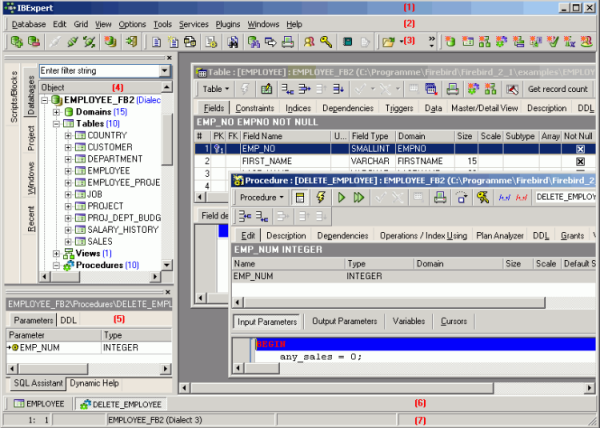
When IBExpert is started, the standard IBExpert screen appears as follows:
The standard IBExpert settings display a large working window, with the menu (2) and toolbars (3) at the top of the screen, a windows bar (6) and status bar (7) at the bottom, and the DB Explorer (4) on the left, divided from the SQL Assistant (lower left) (5) by a splitter.
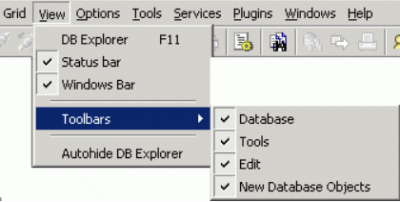
The IBExpert View menu can be used to blend the DB Explorer, status bar, windows bar and toolbars in or out.
Further visual options can be specified by the user in the IBExpert Options menu.
IBExpert Splash screen
The IBExpert splash screen appears when IBExpert is started and displays the IBExpert logo and current installed version number, with a full copy of the software conditions on the second page (click the License tab).
The splash screen may be disabled if wished, by checking the Don't Show Splash Screen option, found under Options / Environment Options on the initial Preferences page.
(1) Title bar
The title bar is the blue horizontal bar at the top of the main IBExpert screen, and at the top of all IBExpert editors. It displays the program or editor name on the left, and in the right hand corner there are four small icons (from left to right):
- Minimize IBExpert / Editor window
- Maximize IBExpert / Editor window
- Exit IBExpert / Exit Editor
(2) Menu
The IBExpert menu bar can be found at the top of the screen:
The individual menu headings conceal drop-down lists, opened simply by clicking on one of the words with the mouse or by using [Alt + {underlined letter}], e.g. the Database menu can be started by clicking with the mouse on the word database, or by using the key combination [Alt + D].
The most frequently-used menu items can also be found in the toolbars, represented as icons, or using the right mouse button in either the DB Explorer or the main editors. Alternatively keyboard shortcuts can also be used.
Keyboard shortcuts / hotkeys (Localizing Form)
Many menu items can also be executed using so-called keyboard shortcuts (a combination of keys). Where available, these are listed to the right of the menu item name in the menus, and when the cursor is placed over a toolbar icon.
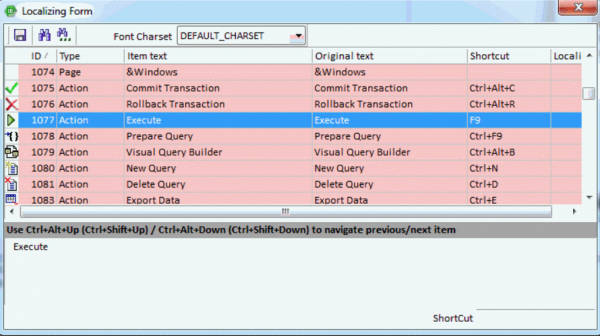
[Ctrl + Shift + Alt + L] works in almost all IBExpert forms and calls the Localizing Form, where you can refer to a complete list of all available shortcuts relevant to the active dialog. It is possible to specify your own shortcut for opening the Localizing Form in the IBExpert Options menu item, Environment Options, under Localize form shortcut.
Using this dialog it is possible to alter the Item text (please use the IBExpert Tools menu item, Localize IBExpert to translate menu items into your own language), and specify your own hotkeys/shortcuts in the bottom right-hand field. Do not forget to save your changes before closing!
(3) Toolbars
The toolbar is a row of symbols (called icons), representing different menu items. By clicking on an icon with the mouse, a pre-defined menu item is executed. This shortcut is ideal for those operations performed often, as they save the necessity of repeatedly searching through the main menus.
Toolbars can be found in IBExpert in the main window and in the main editors. As with most Windows applications the toolbars are positioned as standard in a horizontal row directly below the main menu in the upper part of the window, or in the upper part of the dialogs. They can however be positioned as wished within the window (main or dialog) using drag 'n' drop.
When the cursor is placed over an icon the respective menu command and keyboard shortcut are displayed.
The user can specify which toolbars he wishes to be displayed in the main IBExpert window using the menu item View / Toolbars.
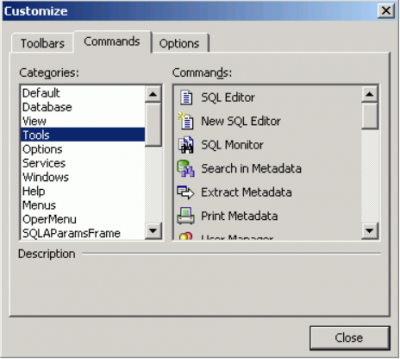
The individual icons can be specified using the Customize… menu item, opened by holding the mouse over the toolbar and right-clicking.
The Customize Tools page displays a list of the toolbar options available. User-defined toolbars can be created here if wished, or reset to the original IBExpert toolbar.
The Command page enables the different menu options listed under Categories to be selected, and the icons (in the right-hand list) added or removed to toolbars using drag 'n' drop.
The Options page allows certain menu and icon options to be checked if wished.
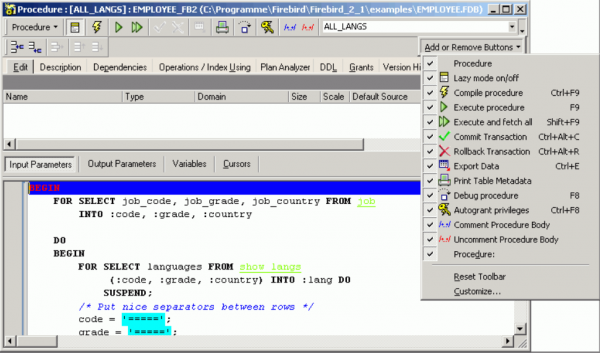
The Editor toolbars can be customized by clicking the downward arrow to the right of the toolbar, and using the menu item Add or Remove Buttons to check the relevant icons in the menu list, or using the above method by selecting the last menu item Customize…
Should you ever experience problems with any of the toolbars in IBExpert, simply delete IBExpert.tb, found in Documents and Settings\<user>\Application Data\HK-Software\IBExpert and then restart IBExpert. A “lost” toolbar can be made visible again by altering the parameter Visible=0 to Visible=1 in IBExpert.tb, for example:
[TSQLScriptForm.bm.Bar0]
Caption=SQL Editor
...
Visible=1
The individual IBExpert toolbars are described in detail in the Addenda.
Icons
Icons are a principal feature of graphical user interfaces. An icon is a small, square graphical symbol.
Each icon represents a menu item, the description of which appears, when the mouse is held over it. Icons can be used as shortcuts by those users who work mainly with a mouse (as opposed to the keyboard).
Icons are usually grouped together in a toolbar, which offers a series of symbols all relating to a certain subject, e.g. new database object, grants etc.
(4) Database Explorer
Please refer to the following chapter, Database Explorer.
(5) SQL Assistant
Please refer to the following chapter, SQL Assistant.
(6) Windows bar
The IBExpert windows bar is a horizontal bar and can be found in the lower area of the screen, directly above the status bar:
This displays the number and type of open windows in IBExpert; the symbols indicating the editor type (e.g. Table Editor, Procedure Editor, etc.), followed by the object name or editor type.
(7) Status bar
The IBExpert status bar is a horizontal bar found in the lower area of the screen, directly below the windows bar:
This displays information concerning the current status of, for example, the connected database, the IBExpert window contents and memory.
253 changes of table left
Each table in an Firebird/InterBase® database has its own metadata changes counter. The metadata of each table can be altered 255 times (add or remove columns, change field type etc.). This limitation is because Firebird/InterBase® sets an internal 1 byte flag, which is stored alongside each data set, representing the so-called record structure version. For example, you have 1,000 data sets in a table with five fields. You extend the table to six fields, and then add a further 1,000 data sets. The old first 1,000 data sets are not revised at all, but are still stored with the old data structure, unless you have instructed the server to set the data content of the sixth field for these old data sets at NULL or a specified default value. If this new field is created with a NOT NULL constraint, these old fields will all need to be updated. The internal flag simply ensures that a maximum of 255 such changes are possible.
When any of these counters reaches the value of 255 it is not possible to alter any tables any further, and a database backup and restore is necessary. The backup and restore ensure that all data sets are now stored with the current single valid record structure, and you can continue to make further table alterations.
IBExpert indicates in the status bar how many changes may be made in the table with the lowest value (253 changes of table [table_name] left) in the database before being forced to perform a database backup and restore:
This information turns yellow once less that 100 changes are still left and red once the values drops to below 50, giving you ample time to allow for your backup and restore.
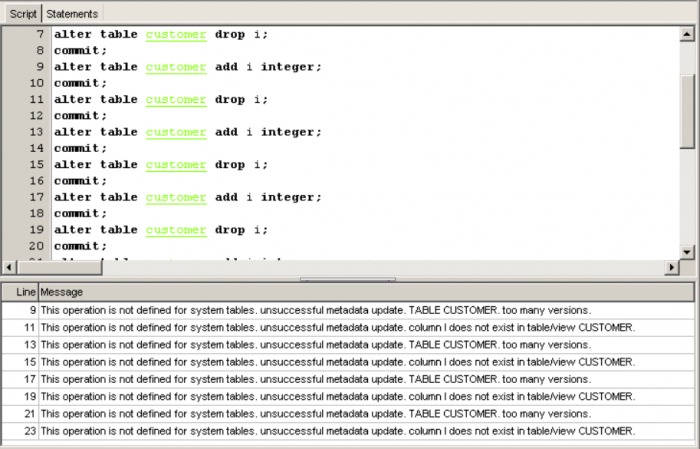
Should you still ignore these warnings, at some stage you will get a too many versions error message.
The table may still be used but no more metadata alterations may be made.
This metadata changes counter may be deactivated if wished, using the IBExpert menu item, Database / Register Database or Database / Database Registration Info, and checking the option Don't display metadata changes counter info on the Additional page. It is however not advisable on databases where there is a lot of manipulation on the database objects.
This obligatory cleanup after many metadata changes is in itself a useful feature, however it also means that users who regularly use ALTER TRIGGER to deactivate triggers during e.g. bulk import operations are forced to backup and restore much more often then needed. Since changes to triggers don't imply structural changes to the table itself, Firebird (since version 1.0) does not increment the table change counter when CREATE, ALTER or DROP TRIGGER is used. One thing has remained though: once the counter is at 255, you can no longer create, alter or drop triggers for that table.
Exit
Exit is the command used to close IBExpert. The program can be closed by using either the menu item Database / Exit, or clicking the black X button in the top right-hand corner of the screen. Alternatively the key combination [Alt + F4] may be used.
IBExpert requires confirmation that you really wish to exit the program - either click on Yes or press the Return/Enter key. Should you wish to eliminate this default setting, uncheck the Confirm Exit box found in the IBExpert Options menu item, Environment Options under Confirmations.
Any editors left open at the time of exiting, will automatically be loaded the next time that IBExpert is started, unless the following default setting is switched off: Options / Environment Options / Preferences - uncheck Restore Desktop after Connect.
All connected databases are automatically disconnected when IBExpert is shut down.
