IBExpert Tables
A table is a data storage object consisting of a two-dimensional matrix or grid of columns and rows, theoretically known as a mathematical relation. It is a fundamental element for data storage.
Relational databases store all their data in tables. A table consists of an unordered set of horizontal rows (tuples). Each of these rows contains the same number of vertical columns for the individual singular information types.
The intersection of an individual row and column is a field containing a specific, indivisible atomic piece of information. I.e. columns list the names of individual fields and rows are the data sets containing the input data. Each database column may be assigned a different data type.
A table is a database object that is part of the database's metadata.
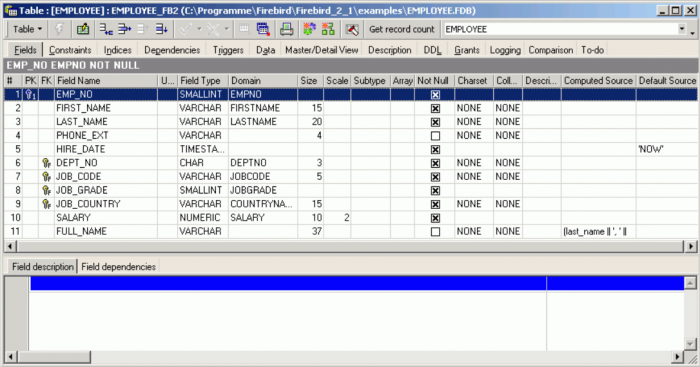
Tables of connected databases can be viewed and manipulated in the IBExpert DB Explorer:
We recommend restricting a table name to no more than 14 characters, so that foreign key names (which are limited to 32 characters up until InterBase® 6 and Firebird 1.5; InterBase® 7 allows 64 characters) can include both related table names in its name:
Prefix FK plus two separators plus both table names, e.g.
FK_Table1_Table2
Please note however that this is not an Firebird/InterBase® restriction, but purely an IBExpert recommendation to enable a clear and logical naming convention for foreign keys.
New table
Creating a new table establishes the table, its columns, and integrity constraints in an existing database. The user who creates a table is the table’s owner and has all privileges for it, including the ability to GRANT privileges to other users, triggers, and stored procedures.
It can be created in a connected database, either by using the menu item Database / New Table, the respective icon in the New Database Object toolbar, or using the DB Explorer right-click menu (or key combination [Ctrl + N]), when the table heading of the relevant connected database is highlighted. A New Table dialog appears, with its own toolbar (Table Editor toolbar), and a drop-down menu (Table button).
When creating a table it is necessary to define a table name that is unique in the database. At least one column must be specified in order to create the table successfully.
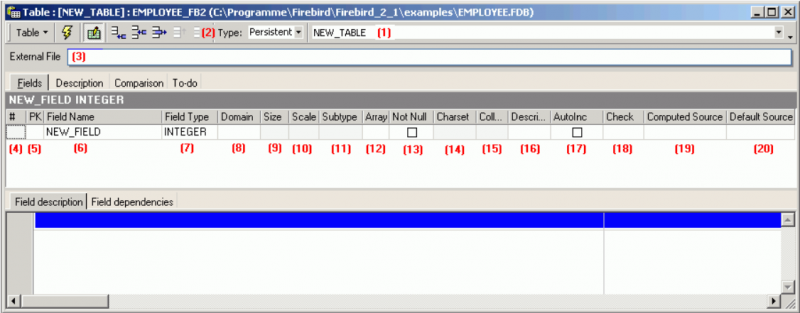
Initially a table name is specified (1) in the upper row:
All data manipulation operations such as SELECT, INSERT, UPDATE and DELETE are carried out using this name.
Use the drop-down list (2) to specify the table type (Firebird 2.1 and InterBase® 7.5 Global Temporary Tables) if necessary. Options include the following:
- Persistent (default specification)
- Temp : DELETE ROWS
- Temp : PRESERVE ROWS
(3) allows you to specify an external file if required.
Detailed information regarding the IBExpert Table Editor can be found in the Table Editor chapter.
Fields:
Furthermore, fields can be defined in the Table Editor. At least one field must be defined, so that the table can be committed and registered as an object in the database [Ctrl + F9]. This enables additional table definitions to be made. Fields can be dragged 'n' dropped from the Database Explorer tree and SQL Assistant into the Table Editor's field list, allowing field definitions to be quickly and easily copied from one table to another.
An overview of the various input fields is listed below.
(4) #: IBExpert assigns each field a consecutive number. It is neither possible nor necessary for the user to enter anything here.
(5) Primary & Foreign Key: In the first column PK one or more fields can be defined as a primary key (double click). A primary key (PK) serves to uniquely identify a data set, and also acts as an index. Foreign keys are defined on the Constraints page and simply displayed here.
(6) Field Name: Each field should be given a logical name.
(7) Field Type: Here the data type can be specified.
(8) Domain: Fields can also be based upon domains. If no domain is specified, Firebird/InterBase® generates a system domain for the field as specified.
(9) Size: Specifies the field size (where applicable).
(10) Scale: Here the number of decimal places can be specified here for all numerical fields.
(11) Subtype: A subtype should be specified for blob fields.
(12) Array: Although arrays contradict all the rules of database normalization, there are certain situations (for example storing measurement data), when they are necessary. For more information, please refer to Array.
(13) Not Null: This check box can be marked by double-clicking or using the space bar. NOT NULL forces data to be entered in this field (i.e. the field may not be left empty). The NOT NULL checkbox is automatically checked when a field itself has not a NOT NULL flag and is based on a NOT NULL domain.
(14) Charset: A character set may be specified for individual fields. This overrides the database default character set. Although this is seldom used, it may be necessary should, for example, Asian, Russian or Arabic addresses need to be input and collated in a database with a European default character set.
(15) Collate: This determines the collation for a character set specified for a field.
(16) Description: Useful for database documentation. The Description page should be used to describe the table; the Description field for describing the field.
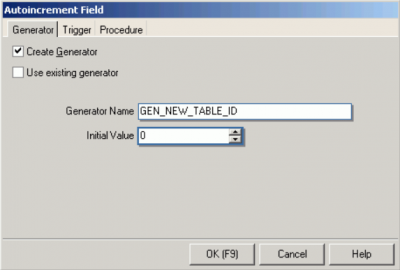
(17) Autoinc: Using the space bar or double-click, a new dialog appears, allowing autoincrements (generator, trigger or stored procedure) to be defined.
(18) Check: Each data set is examined according to an expression defined in brackets for validity. Here certain conditions can be specified (see Check constraint) causing an automatic database examination during data input, to ensure data consistency in the tables and among each other.
(19) Computed Source: SQL input window for calculations. This can be used for fields containing the results of calculations performed on other fields in the same or other tables in the database.
(20) Default Source: Here a default data entry (text or numeric, depending upon the specified data type) can be specified, e.g. the text NOT KNOWN can be entered as a default source, so that if an address field cannot be input by the user because the information is unavailable, the entry NOT KNOWN is automatically entered. It is important to note here that in pre-Firebird 2.1, once a default source has been defined for a field, Firebird/InterBase® cannot subsequently alter it (nor subsequently add a default source). The field needs to be dropped, and a new field created. Firebird 2.1 implemented the SET DEFAULT and the DROP DEFAULT clauses:
Syntax
ALTER TABLE t ALTER [COLUMN] c SET DEFAULT default_value;
ALTER TABLE t ALTER [COLUMN] c DROP DEFAULT;
Note:
- Array fields cannot have a default value.
- If you change the type of a field, the default may remain in place. This is because a field can be given the type of a domain with a default but the field itself can override such domain. On the other hand, the field can be given a type directly in whose case the default belongs logically to the field (albeit the information is kept on an implicit domain created behind scenes).
Tables can, of course, also be created using DDL directly in the SQL Editor, using the following syntax:
CREATE TABLE TABLE_NAME (
COLUMN_NAME1 <COLUMN_DEFINITION>,
COLUMN_NAME2 <COLUMN_DEFINITION>,
...
COLUMN_NAMEn <COLUMN_DEFINITION>;
TABLE_CONSTRAINT1,TABLE_CONSTRAINT2,
...
TABLE_CONSTRAINTn);
Please also refer to the Firebird 2.1 Release Notes chapter, SQL2003 compliant alternative for computed fields. Details regarding the Table Editor's many pages can be found in the chapter, Table Editor.
Once the table has been created do not forget to commit.
See also:
Edit table/alter table
A table can be altered to change its defined structure. It is even possible to perform multiple changes simultaneously.
Alterations can be made in the Table Editor, opened by double-clicking on the table name in the DB Explorer. Alternatively use the DB Explorer's right mouse-click menu item Edit Table or key combination [Ctrl + O].
The following operations may be performed when altering a table:
- Add fields
- Add table level constraints
- Drop fields
- Drop table level constraints
- Modify fields
When dropping fields, it is important to note that the column may not be part of the table's primary key, have a foreign key relationship with another table, contain a unique constraint, be part of a table constraint or part of another column's CHECK constraint.
For further details please refer to Table Editor.
The Constraints page in the Table Editor lists all such fields, so that the developer can quickly ascertain whether constraint alterations/deletions are necessary, before dropping the field in question (or whether, in fact, the field should be dropped at all!).
Using SQL the syntax is:
ALTER TABLE <table_name>
ADD <field_name> <field_definition>
ADD CONSTRAINT <constraint_name> <constraint_definition>
DROP CONSTRAINT <constraint_name>
DROP <field_name>;
A single ALTER TABLE statement can perform multiple adds and drops.
A table can be altered by its creator, the SYSDBA user, and any users with operating system superuser privileges.
ALTER TABLE fails if the new data in a table violates a primary key or UNIQUE constraint definition added to the table. Dropping a column fails if any of the following are true:
- The column is used in a CHECK constraint,
- The column is used in the value expression of a computed column,
- The column is referenced by another database object such as a view.
Important: When a column is dropped, all data stored in it is lost.
See also:
Recreate table
New to Firebird 2.0: The DDL statement RECREATE TABLE is now available in DDL. Semantics are the same as for other RECREATE statements.
See also:
Drop table/delete table
When a table is dropped, all data, metadata and indices in this table are also deleted from the database.
A table can only be dropped if it is not being used at the time of execution of the DROP command and is not referenced by any other database object, such as in a foreign key relationship, a computed source column or a CHECK constraint for another table, or is a part of the definition of a view or a stored procedure or trigger.
Any existent dependencies can be easily viewed on the Table Editor / Dependencies page. Most database objects can be dropped here directly from the Dependencies page or the Dependencies Viewer by right-clicking on the selected object, and choosing the menu item Drop Object or [Ctrl + Del].
To drop a table use the DB Explorer, right-click and select the menu item Drop Table or [Ctrl + Del] or, if the table is already opened in the Table Editor, use the Table Editor main menü item, (opened by clicking Table in the top left-hand corner), Drop Table.
IBExpert asks for confirmation:
before finally dropping the table. Once dropped, it cannot be retrieved; the table has to be recreated if a mistake has been made!
Using SQL the syntax is:
DROP TABLE <table_name>;
Note: When used to drop an external table, DROP TABLE only removes the table definition from the database. The external file is not deleted.
A table can be dropped by its creator, the SYSDBA user, or any user with operating system root privileges.
Create SIUD procedures
By right-clicking on a table in the DB Explorer, you will find a menu item called Create SIUD Procedures. SIUD (often termed SUID) is the abbreviation for SELECT, INSERT, UPDATE and DELETE.
If you want to prevent database users from directly manipulating data with INSERT, UPDATE and DELETE statements, you can use these procedures, which can be executed. Please refer to Create Procedure from Table for details.


