meta data for this page
How to Create a Simple Database in IBExpert
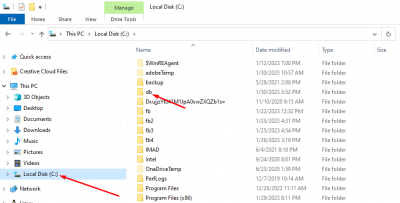
Open up File explorer to first make a directory where you can store your first test database. In my case, I will make a new folder called db inside of my Local Disk (C:) (you can name the folder any name you like). The databases you create can all be kept in this folder.
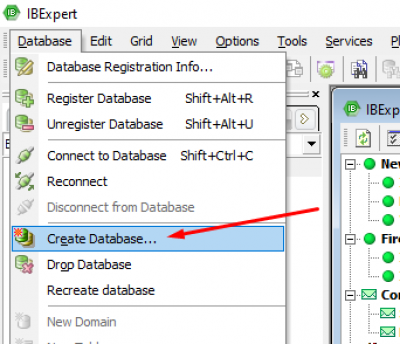
Open up the latest version of IBExpert, click on databases in the navigation bar, and click on Create Database
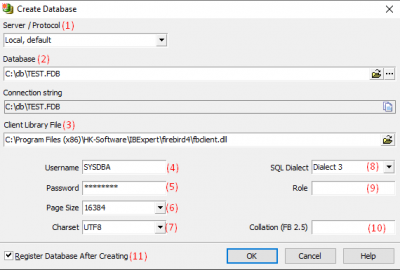
A Create Database window will pop up with all the necessary information to create your database
(1) The Server needs to be specified if the database will be a Remote or a Local Server.
- Local Server: Local databases reside on your local drive or a local area network. They frequently have exclusive APIs for gaining access to the data. They use file-based locking mechanisms when multiple users are sharing them. They are sometimes referred to as file-based databases as a result.
- Remote Server: Remote database servers reside on a separate machine. Sometimes, the information from a remote database server is distributed across multiple servers rather than just existing on a single machine. Even though they store data in a variety of ways, remote database servers offer clients a common logical interface. To create a Remote database server, you must specify a Remote Server, Enter a server name (such as LocalHost), and a Port.
- Server name and Port: These must be known when accessing remotely. The standard port for Firebird and InterBase is 3050. The port can be altered for security reasons or if other databases are already using this port. If a different port is to be used for Firebird/InterBase connection, the port number needs to be included as part of the server name. To change the Server name and port, you can can check out this guide on Changing Remote Service Port and Firebird server name
(2) Database: Enter the file path of the db file we created at the beginning. Enter a name you would like the database to have. In my case, I named it Test2.fdb.
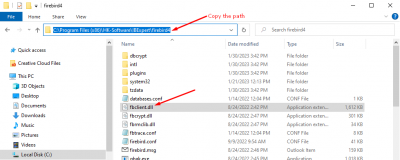
(3) Client Library File: Locate the fbclient.dll file inside your Firebird 3/4 file. To find the fbclient.dll file, first open File Explorer, open your Local Disk (C:), go to Program Files(x86), go to HK_Software, click on IBExpert, go to either Firebird 3 or Firebird 4 folders (choose the version of Firebird you are currently running), and then click on the fbclient.dll file. Next, Copy the file path, enter it inside the Client Library File, and enter the copied path. The path should look something like this “C:\Program Files (x86)\HK-Software\IBExpert\firebird4\fbclient.dll”
(4) Username: The person creating the database becomes the database owner. Only the database owner and the SYSDBA (System Database Administrator) are allowed to perform certain operations on the database (such as a database shutdown). Therefore if the database owner is defined as the SYSDBA, this is the only person entitled to perform these operations
(5) Password: The password are encrypted in the ISC4.GDB, security.fdb or security2.fdb files. If you create a username under the name of SYSDBA, you must not use the password (masterkey), so you can have some security for your database. Make sure that when creating your password you include numbers, symbols, and both uppercase and lowercase letters to make it a secure password. Make sure you can remember the password.
(6) Page Size: Specify the database Page Size in bytes. You can read more about Page Sizes here.
(7) Charset: Define a character set for your database. You can read more about Character Sets here.
(8) SQL Dialect: Select an SQL Dialect which can be either Dialect 1 or Dialect 3. You can read more about Dialect 1 or 3 here
(9) Role: You can create a database role, for example “ACCOUNTS” role, which can represent different department for example for a restaurant.
(10) Collation (FB 2.5): This field allows you to create a collation for Firebird 2.5 databases. A collation defines the sort ordering and uppercase conversions for a string.
(11) Register Database After Creating: Make sure this is ticked, so we can register the database after creating it. You can now Registering a Database
Now we can click on the OK button so we can create the database. You can now follow this guide to Registering a Database


